Before we start, I’d like to make a few comments about Camaro body restoration. There is a well known company making very high quality reproduction Gen1 Camaro bodies. Although they are licensed by GM, you still have a “kit car” in the eyes of most state DMV’s. You’ll have a great car when you’re finished but it will never be considered a true Camaro by most people due to the lack of an original VIN. An alternative is to restore your original body and retain the VIN heritage. Many people feel that it is not worth restoring a seriously rusted out body but it can be done cost effectively. Virtually all the body parts are being reproduced. You just need a shop that knows how to assemble them back into a Camaro. As youcan see from this little documentary, we’re up to the task. No one is reproducing complete Gen2 Camaro bodies. For this great looking car, your only option is a restoration like the one you are about to see.
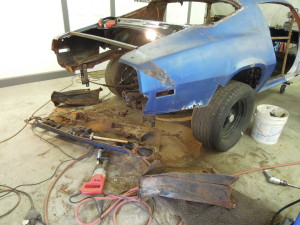
This 1971 Camaro would be considered beyond repair by most people. Virtually every piece of metal on the car was severely rusted. The car suffered from both cosmetic type damage and structural rust damage. The owner still wanted to save it so Steve and Billtook on the challenge.
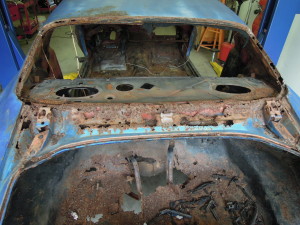
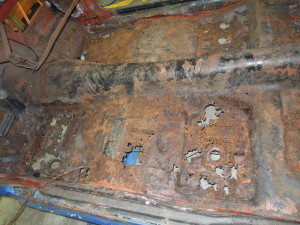
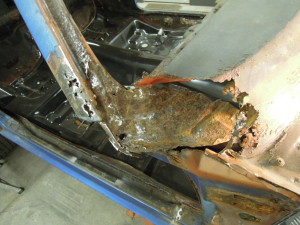
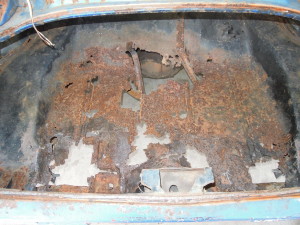
Here’s a small sample of what we started with.

We take a lot of pride in how efficiently we do our work. This body build would be a one to two year project at most shops. We built this body insix weeks, working part time. We could have done it faster but we had to wait for some back-ordered parts. Don’t think for a minute that we just slapped thisbody together. It is straighter and more consistent then the factory every produced. What most people don’t realize is that’s all the time it really takes to do a job like this when you work efficiently and aren’t trying to pad up the customer’s labor bill.
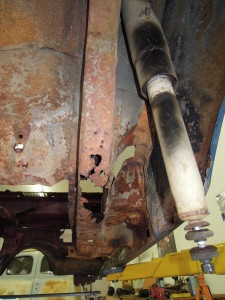
Here is what we knocked out in less than a week. We cut out the old floor and salvaged the rear frame supports so we had something to index/measure from. Despite being rusted out, the car was still reasonably square. We needed new rear frame rails but they’re backordered indefinitely. You can see where we boxed the old frame rails with steel heavier than the factory used and more than doubled the number of weld points.
Then we did the one-piece floor pan to get the maximum strength back into the body. Doing a one-piece floor pan is a real hand-full but it’s worth it. This isn’t going to be an extreme performance car so as long as we get itback to OEM strength we’ll be fine. The way we are doing it, it will be definitely stronger that that.
This was about all we could replace without bracing up the body. We wanted to do as much as we could without the bracing because it’s a chore to climb around all that stuff. We’re welding from every angle you can imagine. Having it on the lift is great but it’snot going to hold the body square on its own. Fortunately these small unibody shells are very rigid on their own since they don’t rely on a frame. If taken apart in an intelligent manner they don’t need that much bracing. If this was a body on frame type car it would be a different story.
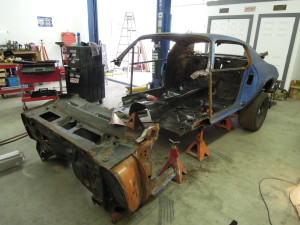
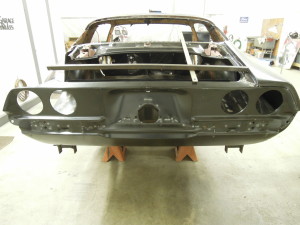
After digging into the car further we decided to replace even more metal than originally thought. When the body is done the only original parts will be the roof cap, the back seat support and sections of the rocker panels. The next project was to replace the entire front section of the unibody. This includes the front rocker sections, firewall, floor toe-kick section, door hinge pillar, lower cowl, side cowl panels and upper dash panel. It took a couple of weeks for some of the back ordered parts to show up. Since all of those pieces are interconnected you can’t set any of them until you have them all. They came from three different manufacturers so we had to be able to account for variances from stock when repositioning everything.
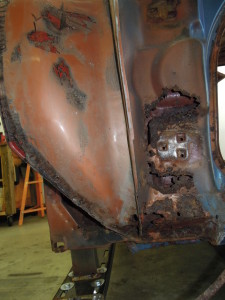
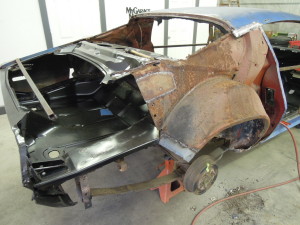
Here’s what we started with: Major rust out in the door hinge pillar and lower A-pillar. The cowl was rusted completely through and the firewall perforated. The forward sections of the rockers were also rusted through.

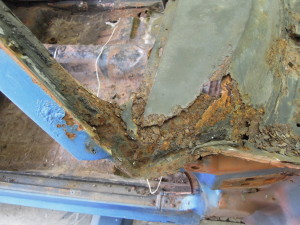
After leveling the body we took measurements in all thecritical areas, welded in support braces and confirmed the measurements. Cutting the A-pillars loose was a surgical procedure. The mounting tabs were sandwiched between the dash cap and lower cowl, while also being welded to the door hinge pillars on three sides. We had to save the A-pillar tabs but they were the weakest and most damaged of the parts. This meant we had to cut, grind and chisel the other metal away so we didn’t hurt the tabs. Here’s what they looked like after breaking them loose. Once the front section was completely removed, the A-pillars and tabswere trimmed, patched (with metal) and rust treated.
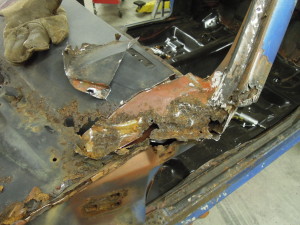
With those free we could cut the rest of the front end loose.
We did a mock-up of the new parts to determine how things would fit together and what needed to be modified in order to meet the original dimensions. There arefive different parts making up this assembly. The lower sections came with the full length rocker panels but we opted not to use the whole thing. Amazingly the rear parts of the original rockers were rust free. By keeping the original rear portion of the rockers we were able to maintain the geometry of the back half and also stiffen it with the new one piece floor pan. If we did have to replace the complete rockers and floor we would have essentially needed to build the body from scratch (like the factory did) and would have needed a frame jig.
It took a lot of fitting, tweaking and massaging but we got everything in the correct position. All the original measurements were recreated and the body was squared to tolerances at least as good as the factory used. We’re using a factory type spot welder to give an original appearance but dramatically increased the number of welds. In the parts that aren’t visible we’ll MIG weld everything using a lot more weld points than the factory did. There will be places that are continuously welded where the factory only used a couple of spot welds. All the parts that will be inaccessible after final welding will be painted before assembly and seam sealed afterwards.
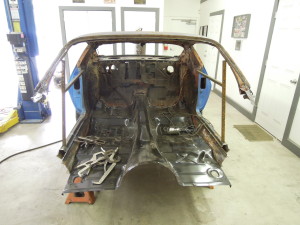
Next we moved to the back half of the car. This phase involved the rear package tray, trunk cowl, and trunk floor and taillight panel replacement. It may seem that we replaced things in a strange order but this was done based on sound engineering. By strategically replacing parts, we could maintain body geometry and rigidity without spending time building major bracing systems. As they say “work smarter”.

For starters, here’s a shot of the package tray area. There wasn’t much that could be salvaged. To our amazement, no one reproduces the trunk lid hinges. As a result we had to carefully extract them from the old cowl and restore them.
After cutting out the package tray and trunk cowl we got down to the supports for the tray which were also rusted out. We cut those out, repaired the supports coming off the inner fenders then welded in the new tray supports. The package tray and trunk cowl are two separate pieces that first had to be spot welded together. When assembled, they create both the upper and lower trunk cowl. This double layer assembly holds the hinges for the trunk lid. The picture on the left shows the new package tray supports. The picture on the right shows Steve weldingthe entire assemblyin place.
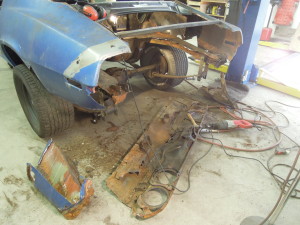
 Next up was the start of some real fun, replacing the entire back half of the car. Here’s a shot of the original trunk pan.
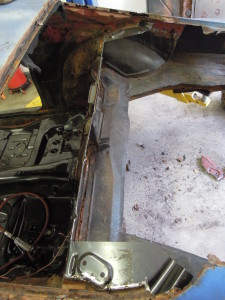
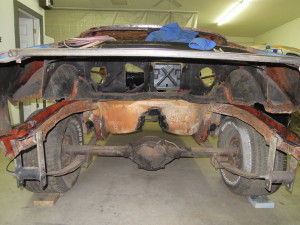
Using a plasma cutter, air chisel, cut-off wheel and Saws-all, we cleared out the back section of the car. The trunk pan was plasma cut around the rear frame rails then the residual metal chiseled and ground off the rails. The trunk pan extensions had to be cut from the trunk pan then the lower section of the quarter panels were cut off. This was faster and easier than trying to separate the extensions from the quarter panels. With all that out of the way, the tail light panel was cut and chiseled loose. The picture on the right shows the cleaned-up frame rails. You can also see all the rust damage on the inner fenders. They had to be repaired with new steel before the trunk pan could be installed.
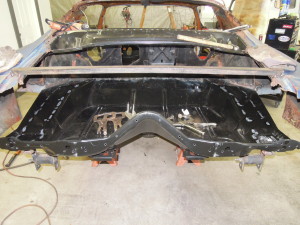 On the leftis the trunk pan welded in place. The location of the pan is critical for alignment of all the other pieces in the back of the car. Before we welded this in place we had to mock up the back end and hold all the pieces together with clamps. Once we were satisfied with the placement, we tacked it down. The tail light panel is made up of two pieces that have to be spot welded together before installing the whole assembly. Those pieces along with the trunk pan have to line up perfectly with holes in the frame rails. A lot of measurements and alignment checks were done throughout this process. We also replaced the parts in a specific order that allowed us to keep the body rigid and also gave us known good index points to measure from.
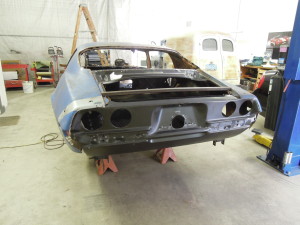
The picture on the right shows the tail light panel assembly welded to the trunk pan and frame rails. It looks like a Camaro again! The rear quarters are not welded to the tail light panelbecause those are the next items to be removed.
 On the left is an older picture showing the condition of the quarter panels. They had considerable rust which had been covered over with body filler. The passenger side had also been hit and not repaired properly. With the entire rear window track rusted out, the only practical solution was to replace both quarter panels.
 You can see the rust damage to the underlying structure after the quarter panel was removed. Some patch panels have already been welded in at this point. There was considerably more reconstruction needed to the rear window area and inner fender lip. The rusty metal you see in some cases was just surface rust. That was sanded off and the metal rust-treated and primed.
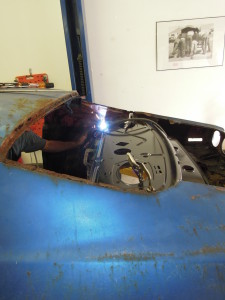
In these shots you can see the new quarter panel welded in place. There was another piece called a trunk extension that ties the main trunk floor to the inner fenders, tail light panel and the quarter panel. If any one of these pieces is not installed properly, the entire assemblywill not fit together. The allowable error is incredibly small since there is a stack of four layers of metal that all has to come together perfectly at the bottom of the tail light panel. We did one quarter panel at a time.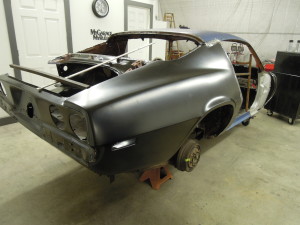
With the trunk floor and tail light panelalready indexed off the oldquarter panels, we could remove one quarter at a time and have three known, correct panels to measure from for installing the new quarter.
Here’s the driver’s side under construction.
 On the left the old metal has been cleaned and rust-proofed and the panel repairs started. On the right you can see the piece called the trunk extension in place and how it ties into the other parts of the body. Repairs are underway in the back window areaand most of the new and old metal has been primed.
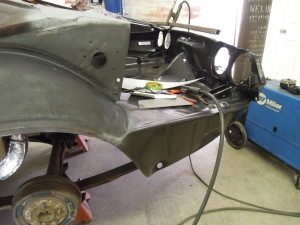
Here is the final product. On the left both quarters are welded in placeand all the sub-structure has been repaired. In the right-hand shot the hinges, trunk lid and filler piece are installed.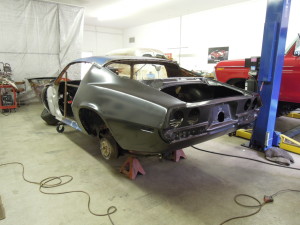
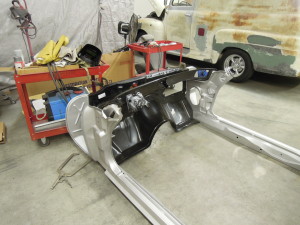
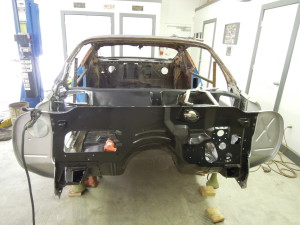
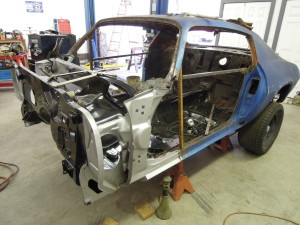
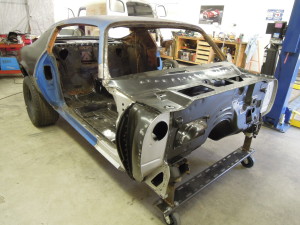 You’re looking at an almost new 1971 Camaro body that’s as good as or better than the original factory specs. The trunk lid gaps are perfect without any further body work. The areas of blue that you see are the only original parts of the car. All of the rest of the body parts are bolt on items. The next step in the build is to clean, sand and prep the body shell for epoxy sealer and primer. This car made it almost fifty years with minimal metal protection and a lot of abuse. With all the new metal and the current rust prevention technology, there’s no reason why this car can’t still be around a hundred years from now. How cool would it be to drive a 1971 Camaro in the year2116 ?
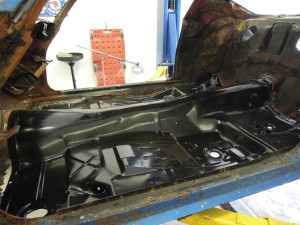
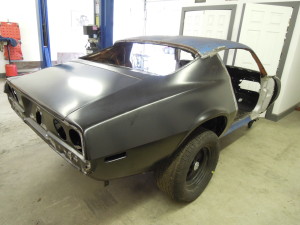
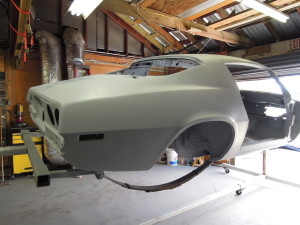
Here are some pictures of the completed unibody with two coats of epoxy sealer and three coats of urethane primer. This body won’t rust any time soon….. These photos were taken in the customer’s warehouse. This is an example of a project where we are working together with the car’s owner. We’re doing some of the work then moving the car to his warehouse so he can do the next steps. We are also helping him with some tasks at his place. At some point the car will return to our shop for more work. We do our best to be flexible with projects like this so that all parties get to share in the fun and prideof restoring a vintage car.
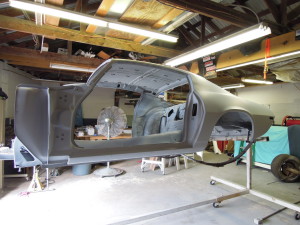
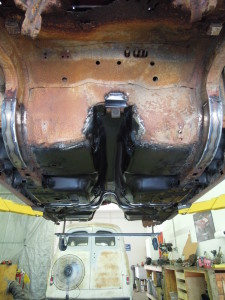
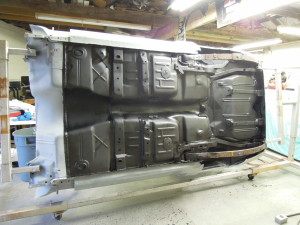 With the body shell on a rotisserie, it’s much easier to do some tasks like coating the underside. We added some rubberized undercoating to add even more corrosion protection to the car. We like to do this before starting the suspension installation so we can get complete coverage.
More to come as the buildcontinues!